I used the construction method for Cathedral Windows taught by Jenny Doan at Missouri Star Quilt Company in this tutorial: https://www.youtube.com/watch?v=akKU0zg-qaw The main differences are that I used the 2.5" square size and the same fabric color for the background and the "frames" and only used colored squares for the "window panes".
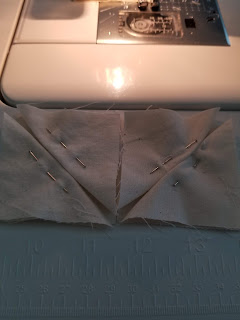
Also, I found it easiest to keep the pieces in the right places using pins. The 2.5" background square gets 2 more 2.5" background squares folded on the diagonal pinned to it.Line up the layered, pinned squares next to each other to form a "V" shape as above. The backs of the joined squares then look like this:
Form a diamond shape with 4 squares:
Make rows of the diamonds, then join the rows together.
To make an 18" pillow cover, I joined 9 quantity 2.5 inch squares together, which produces 4 1/2 "diamonds per row.
Yes, it's a lot of 2.5 inch squares to cut. 243 squares of just the background and frames if you do them the same color.
Once you have the size you want, you can count how many "diamond" shapes to know how many colored fabric squares you'll need. You can get away with 2.25" squares for the colors.
I laid out the colors in sort of ombre style since I had lots of blues and aquas, but you can choose any layout. I also wanted to continue the colors on the edges, so I cut some of the squares in half diagonally.
I put a pin in the center of each square to hold it in place while sewing the background "diamond" edges down on the bias to get the curved effect. Jenny's video tutorial explains this step really well.
I added 2 rectangles of coordinating fabric to the back of the cathedral front to make this cover. The 2 back panels were cut at 18" by 12" so that they overlap the pillow and so that the cover is removable.


No comments:
Post a Comment