Saturday, January 22, 2022

Cathedral Windows Pillow Covers

 I used the construction method for Cathedral Windows taught by Jenny Doan at Missouri Star Quilt Company in this tutorial:  https://www.youtube.com/watch?v=akKU0zg-qaw  The main differences are that I used the 2.5" square size and the same fabric color for the background and the "frames" and only used colored squares for the "window panes".

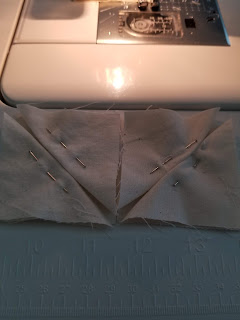
Also, I found it easiest to keep the pieces in the right places using pins.  The 2.5" background square gets 2 more 2.5" background squares folded on the diagonal pinned to it.

Line up the layered, pinned squares next to each other to form a "V" shape as above.  The backs of the joined squares then look like this:
Form a diamond shape with 4 squares:
Make rows of the diamonds, then join the rows together.
To make an 18" pillow cover, I joined 9 quantity 2.5 inch squares together, which produces 4 1/2 "diamonds per row.  
Yes, it's a lot of 2.5 inch squares to cut.  243 squares of just the background and frames if you do them the same color.
Once you have the size you want, you can count how many "diamond" shapes to know how many colored fabric squares you'll need.  You can get away with 2.25" squares for the colors.
I laid out the colors in sort of ombre style since I had lots of blues and aquas, but you can choose any layout.  I also wanted to continue the colors on the edges, so I cut some of the squares in half diagonally. 
I put a pin in the center of each square to hold it in place while sewing the background "diamond" edges down on the bias to get the curved effect.  Jenny's video tutorial explains this step really well.

I added 2 rectangles of coordinating fabric to the back of the cathedral front to make this cover.  The 2 back panels were cut at 18" by 12" so that they overlap the pillow and so that the cover is removable. 

Friday, January 21, 2022

Dinosaur Print Baby Quilt


Here's a simple quilt I made using the free pattern from Riley Blake designs.  It was their "Little Giraffe" pattern for the baby fabric line, which I adapted to dinosaur.  Here's a link to the free pdf pattern:  https://www.rileyblakedesigns.com/assets/images/freepatterns/quiltpatterns/GiraffeCrossingFreePattern.pdf

These aren't the best photos, but they give an idea of the finished quilt.  The cute Robert Kaufman dinosaur print didn't seem to be part of a fabric bundle of coordinating prints, so I pulled the primary colors from the dinosaur print and got my own coordinates.  Some are from Joann's fabric, some from Walmart fat quarters, and one Dr. Seuss stripe print from Robert Kaufman.  It's photographed upside down and right side up since the print isn't directional, there really isn't a right side to it.


Saturday, November 6, 2021

Favorite Things Quilts

 Working full time as a Technical Support Engineer for large Enterprise data center servers meant I had less time to craft.  During the COVID restrictions and distancing in 2020 and 2021, I turned to quilting.

I made "Favorite Things" quilts for each family member with various designs that show case busy fabric prints representing things we like.  

The design inspiration for my daughter's quilt was this Craftsman Style quilt pattern:  


She chose navy blue minky fabric with gold zodiac symbols for the backing.


The design for my son's quilt was just squares separated by sashing strips and corner squares the same size as the sashing.


We didn't photograph the backing, but it's the same gray as the corner stone squares.

My husband's quilt front was inspired by the "Key to my Heart" quilt as well as an ocean themed quilt I made in 2019.  


The back of his quilt uses the corner HST scraps from the quilt front to make pinwheel border strips for the Riley Blake 4 Utah National Park panels.  I think I like it even better than the front!


My quilt is based on the "Dazzling Diamonds" pattern from Missouri Star Quilt Company.  I saw a cute Halloween fabrics version of it in one of their publications as well.  It has a sort of retro 60s new age space needle vibe to it, so I used planet fabric for the borders and backing.


I took all 4 quilts to a long arm quilting store to be quilted since I don't enjoy machine quilting.  The shop I like to use for quilting is called "Quilts on the Corner" in Sandy, Utah.


Monday, February 1, 2016

2015 Year In Review

I stopped blogging and moved on to other adventures in 2015.
In June 2015, my family and I went to the beautiful city of San Francisco. So many scenic views captivated us throughout the city.  Like Pier 15 below.
We went to historic Alcatraz island, which has become a bird refuge (see white bird pictured above), and took the self-guided prison tour.

We traveled through Reno, Nevada and stopped at Lake Tahoe where a blue jay adopted my husband.
We visited and hiked in Bryce Canyon, National Park. We also climbed inside the cave of a small waterfall in southeastern Utah (see below) and belly crawled through Mammoth Caves (not pictured).

My husband, daughter and I took the 15 mile round trip hike up and down Mount Timpanogos in Utah County, Utah.


Pollution and strong winds from forest fires in Idaho obscured much of the normal views from the summit even in Utah, but we still got to see a lot of pretty wildflowers and varied terrain trails.

I returned to school in June to study web development and computer programming.   **UPDATE -- I graduated on August 6, 2016!! **


Tuesday, July 15, 2014

Tessellating Pinwheel Baby Quilts


I've already pieced and quilted two baby quilt tops on the Janome 6500, and I love it! The 1/4" piecing foot made the piecing so easy!  Quilting with the even feed foot was easier and fed more evenly than the walking foot on my Viking machine.  I used stitch 28 and variegated thread to quilt all 16 pinwheels on each of the two quilts.

It took hours to make the quilts, but the extra throat space on the machine's harp made it so much easier to move the quilt all around while stitching.  The needle up/down feature set to down allowed me to pivot around corners easily.  I used the automatic bobbin thread cutter several times, too.  These features actually saved time and made a better quilting experience than I've had in the past.

The drawbacks to my new Janome machine:  large size and weight, price tag, and thread lint build up in needle uptake lever area of the machine.  I still love it, though!  Also, the machine was only available at one brick and mortar dealer nearby for purchase.  Luckily, that one dealer actually let me test drive the machine for myself.

Another odd drawback of the machine was that it continued to stitch even after I removed my foot from the pedal.  It took three or four more stitches by itself.  Not sure why, but I suspect possible overheating from hours of sewing--or maybe the foot pedal jammed somehow.  Not a big deal.

I used the Sizzix Bigz Tessellating Pinwheel die to make all the fabric cuts for both quilts.  The second quilt (not pictured) has a pink binding, but is otherwise nearly identical to the one shown. The die made fabric cutting easy and much safer for me than rotary blade cutting.  The 2 1/2" strip die made the bias binding strips for both quilts really easy.  I like how the die only has blades along the sides of the strips and not at the top and bottom.  That enables me to control the length of the strips.